[무료] 자바스크립트로 알아보는 함수형 프로그래밍 (ES5) - 인프런 | 강의
마플(http://www.marpple.com)의 CTO 유인동님이 알려주는 함수형 프로그래밍에 대한 강좌 입니다. 함수형 프로그래밍으로 라이브러리를 직접 만들어가며 함수형 프로그래밍의 패러다임과 코딩의 즐거
www.inflearn.com
//테스트 데이터
var users = [
  { id: 10, name: 'ID', age: 36 },
  { id: 20, name: 'BJ', age: 32 },
  { id: 30, name: 'JM', age: 32 },
  { id: 40, name: 'PJ', age: 27 },
  { id: 50, name: 'HA', age: 25 },
  { id: 60, name: 'JE', age: 26 },
  { id: 70, name: 'JI', age: 31 },
  { id: 80, name: 'MP', age: 23 }
];
//앞으로 함수를 담을 obj
const _ = (()=>{
return {
};
})();filter
요소를 걸러내는 함수
인자로 받은 요소 수와 같거나 적은 요소를 리턴한다.
//함수를 담은 obj
const _ = (()=>{
    return {
        filter:filter ,
    };

/* 요소를 걸러내는 함수, predi라는 보조함수를 인자로 받는다. */
function filter(list, predi){
    //함수형 스타일은 기존 요소를 손상시키지 않고 항상 새로운 값을 리턴한다.
    const result = [];
    for(const val of list){
        //보조함수를 인자로 받아
        if(predi(val)) result.push(val);
    }
    return result;
}
})();
//나이 25세 이상 사용자 걸러내기
//절차지향 코드
const tmp = [];
for(const user of users){
if(user.age>=25) tmp.push(user);
}
console.log(tmp);
//함수형 코드
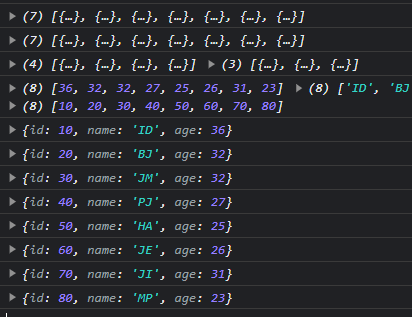
console.log(
_.filter(users, u=>u.age>=25)
);
console.log(
_.filter(users, u=>u.age-(u.age%10) === 20), //20대만
_.filter(users, u=>u.name.startsWith("J")) //J로 시작하는 user
);
map
요소를 변환시키는 함수
들어온 요소와 같은 수의 변환된 요소를 리턴한다.
/* 요소를 변환시키는 함수*/
function map(list , mapper){
    const result = [];
    for(const val of list)
        result.push(mapper(val));
    return result;
}
//map 사용
console.log(
_.map(users, u=>u.age) ,
_.map(users, u=>u.name) ,
_.map(users, u=>u.id) ,
)
중간 점검
//함수를 담은 obj
const _ = (()=>{
    return {
        filter:filter ,
        map:map ,
    };

/* 요소를 걸러내는 함수, predi라는 보조함수를 인자로 받는다. */
function filter(list, predi){
    //함수형 스타일은 기존 요소를 손상시키지 않고 항상 새로운 값을 리턴한다.
    const result = [];
    for(const val of list){
        //보조함수를 인자로 받아
        if(predi(val)) result.push(val);
    }
    return result;
}
/* 요소를 변환시키는 함수*/
function map(list , mapper){
    const result = [];
    for(const val of list)
        result.push(mapper(val));
    return result;
}

})();
향상된 for문을 사용하고 있어 편리하지만, 분명히 반복문에서 코드 중복이 발생하고있다.
each
들어온 요소 리스트에서 값을 하나씩 꺼내어 주는 함수
function each(list, iter){
    for(const val of list) iter(val);
    return list;
}
_.each(users,u=>console.log(u));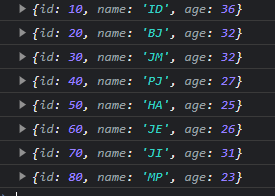
filter, map 에 적용 후 동작 확인
//함수를 담은 obj
const _ = (()=>{
    return {
        filter:filter ,
        map:map ,
        each: each,
    };

/* 요소를 걸러내는 함수, predi라는 보조함수를 인자로 받는다. */
function filter(list, predi){
    //함수형 스타일은 기존 요소를 손상시키지 않고 항상 새로운 값을 리턴한다.
    const result = [];
    //보조함수를 인자로 받아
    each(list, val =>{
        if(predi(val)) result.push(val);
    });
    return result;
}
/* 요소를 변환시키는 함수*/
function map(list , mapper){
    const result = [];
    each(list, val => result.push(mapper(val)));
    return result;
}

function each(list, iter){
    for(const val of list) iter(val);
    return list;
}
})();
함수가 함수를 받아서 처리하는 것을 고차함수 혹은 응용형 함수라 한다.
함수 내부를 보면, 기존 값에 대한 변형 없이 항상 새로운 값을 리턴하고 있다. 그래서 코딩을 계속 진행하는 과정에도 원본 데이터에는 손상이 가지 않을 것을 알 수 있다.
섞어써보기
//섞어쓰기, 30세 이상, user 이름
console.log(
    _.map(_.filter(users, u=> u.age >=30), u=>u.name)
);
'개발 > 함수형 프로그래밍' 카테고리의 다른 글
| 07 - 컬렉션 중심 프로그래밍 - map (수집하기) (0) | 2023.06.17 |
|---|---|
| 06 - 다형성 높이기 (0) | 2023.06.16 |
| 05 - 파이프라인, pipe, go (1) | 2023.06.14 |
| 04 - map, filter에 curryr 적용, reduce (0) | 2023.06.12 |
| 03 - 커링, curry, curryr (0) | 2023.06.11 |